Welcome to the ultimate guide for connecting the Zoom R16 to a computer. We’ll look at the benefits of this setup. It turns your R16 into a powerful audio interface, perfect for recording. By linking the R16 Zoom to your computer, you’ll improve your recording quality and make your work easier. This article will give you tips and step-by-step instructions to make setting up your Zoom R16 smoother.
In the next parts, we will cover what you need, how to install drivers, and how to set up your R16 with DAWs like Cubase and Pro Tools. This guide is designed to help both new and seasoned users. Our goal is to make connecting your device simple and to boost your recording output.
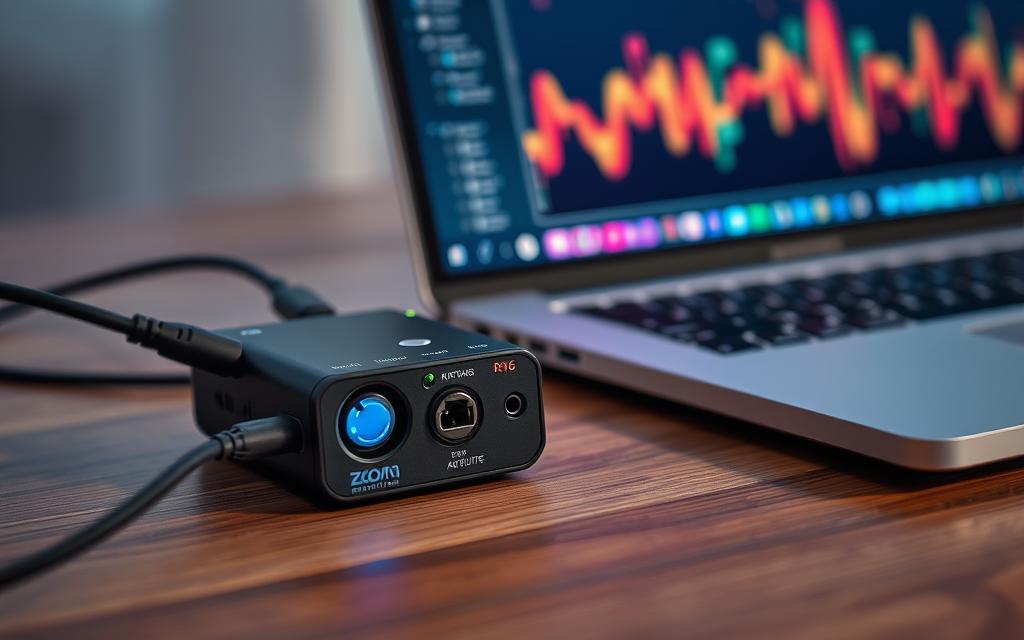
The Zoom R16 is a multi-track recorder that packs many features for audio recording. It lets users record on eight tracks at the same time. This makes it great for making music and designing sound. Plus, it works well as an audio interface.
The R16 allows 16-track playback and records onto SD and SDHC cards. It can hold up to 100 hours of audio. Expect top sound quality. It records in high-quality formats and handles both mono and stereo WAV files. This makes the R16 a top choice for recording.
The R16 has eight inputs for mics and instruments. It also comes with 135 DSP effects and 390 patch memories. This means lots of options for creativity. It has a clear LCD display that is easy to read, even in dim light.
The R16 can connect to computers as a USB audio interface. It works with both Windows and macOS systems. Powered by six AA batteries, it runs for over 4.5 hours. This means you can record with it almost anywhere without worry.
Connecting the Zoom R16 directly to a computer changes your audio production game. It makes recording simpler by allowing you to capture audio in real time, get immediate feedback, and mix effortlessly. By understanding the Zoom R16 benefits of a direct connection, you see its power. It not only eases track transfer but also enhances multitrack recording. This is especially handy in live or studio settings.
Understanding the Benefits of Direct Connection
Linking the Zoom R16 with your computer opens up several features:
Record up to eight inputs at once, perfect for live bands or many instruments.
Playback up to 16 tracks with a metronome, streamlining your workflow.
Use built-in effects and edit songs to make your music sound better.
The USB connection offers both power and data transfer, adding convenience.
With a 1 GB card, record for 200 minutes, great for long sessions.
Requirements for Connection
To link the Zoom R16 and a computer, you need certain Zoom R16 connection requirements. You must have:
A compatible USB cable for the link.
Install the right drivers for smooth computer connection.
A suitable Digital Audio Workstation (DAW) for processing audio.
Your computer’s hardware should meet the needed specs for recording and playback.
Downloading and Installing the Zoom R16 Driver
Installing the Zoom R16 driver is vital for your audio interface to work well with your computer. This driver is key software that helps the operating system talk to the Zoom R16 hardware. When it’s installed correctly, your Digital Audio Workstation (DAW) performance improves, making recording and playback smooth.
What Is a Driver?
A device driver is special software that helps the operating system connect with hardware. For the Zoom R16, this driver gives the computer’s audio system the right instructions for managing sound. If you don’t have the right drivers, you might face problems like your device not being recognised or bad audio quality. So, knowing about device drivers is crucial for those setting up audio interfaces.
Step-by-Step Guide to Download and Install the Driver
Start your Zoom R16 driver installation by following these steps:
Go to the Zoom Corporation website for the driver download instructions.
Find the section for the Zoom R16 and pick the driver for your operating system.
Download the needed driver file to your computer.
Make sure the Zoom R16 is connected and turned on before you install. You should see it in Device Manager if you have Windows 10.
Run the driver file you downloaded and do what the instructions say to install it.
After installing, restart your computer to make sure all changes take effect. Use Device Manager to check that the driver is installed right.
Taking these steps carefully when installing the audio interface makes sure your Zoom R16 works its best. Learning about your hardware with resources like this hardware components guide also helps improve your system’s performance.
Configuring Your Zoom R16 as an Audio Interface
To get the most out of your Zoom R16, you must set it up properly. This means putting it in audio interface mode for a smoother connection with your DAW. Knowing the right settings helps you get the best sound quality.
Booting the Zoom R16 into Audio Interface Mode
Starting in audio interface mode is easy. Just turn on the Zoom R16 and pick the audio interface option from the menu. Make sure to check the sample rate. Although 96K is best for recording quality, you can switch from the standard 44.1K. At 44.1K, reverb is for monitoring only.
Settings in Popular DAWs (Digital Audio Workstations)
After setting your Zoom R16 to audio interface mode, adjusting it in DAWs like Reaper is next. Go to your DAW’s audio settings and choose the Zoom R16 driver. Use ASIO for better sound quality at higher sample rates. It’s important to set up the right inputs and outputs in Reaper.
The table below highlights important audio settings:
Aspect
Recommended Setting
Notes
Sample Rate
96K
Best for quality, especially in Reaper.
Input Levels
Between green and orange LEDs
Keep recordings clear without distortion.
Effects Utilisation
DAW plugins over built-in FX
DAW plugins offer better quality and versatility.
Stereo vs Mono
Stereo for drums
Gives more mixing options.
Outboard Preamp
Recommended for guitars
Improves sound quality more than built-in effects.
Setting up your Zoom R16 correctly lets you make the most of your recording time. It ensures a smooth process with your favourite DAW.
Connecting the Zoom R16 to Reaper
Setting up the Zoom R16 with Reaper means completing a few initial tasks. These tasks make sure the device works well with Reaper for recording multiple tracks. Once set up properly, musicians and producers will find recording smoother and more effective.
Initial Setup and Preferences
Start by adjusting the audio settings in Reaper for the Zoom R16. Go to the “Preferences” section to pick the Zoom R16 as your ASIO driver. This choice improves performance. Here’s how to do it:
Open Reaper and select “Options.”
Go to “Preferences” and then choose “Audio.”
In “Device,” pick “ASIO” and select the Zoom R16.
Check that the sample rate matches your project.
After adjusting these settings, make sure to assign all inputs correctly. This step is essential for clear recordings. It also helps your workflow by letting you hear and adjust input levels accurately.
Testing the Audio Interface Functionality
Once you’ve set everything up, test the audio interface to make sure it works. Here’s how to check the Zoom R16’s functionality:
Start a new project and add some tracks.
Set each track to the right input from the Zoom R16.
Check if the input levels are showing up in Reaper.
Record something briefly, then play it back for quality.
If you run into problems, look for help in user forums. Many solve latency issues using the ASIO4ALL driver, which might help. For more on working with the Zoom R16 and Reaper, check out this link: dual booting and operating systems.
Follow these steps to set up your Zoom R16 for multitrack recording in Reaper. It will improve your music production significantly.
Using the Zoom R16 as a Control Surface
The Zoom R16 makes managing your digital audio workstation a breeze. You can control Reaper functions like faders and transport controls with it. This reduces the need to use a mouse and boosts efficiency.
Setting Up the Control Surface in Reaper
First, make sure the Zoom R16 is connected to your computer. Then open Reaper and go to the Preferences menu. Here, click on the control surfaces section and select the Zoom R16. Now, you can use its faders and knobs to tweak your mix.
Troubleshooting Common Issues
Sometimes, you might run into problems with the R16. Issues can range from driver conflicts to recognition failures or even latency. Start by checking your connections and updating your drivers. If you still have trouble, look at Reaper’s audio settings to make sure they’re set up right. Fixing these issues will make mixing audio with the Zoom R16 more enjoyable.
Testing Your Setup: Monitoring Your Mix
Having the best setup for audio monitoring is key. Different audio monitoring methods affect your recordings and mixes. Knowing how to check your audio well boosts your production skills. The Zoom R16 makes this checking easy and quick.
Options for Audio Monitoring
You can choose from different audio monitoring methods. Studio monitors and headphones help in different ways. Studio monitors give a true sound, while headphones let you hear the small details. Use both to make your mix better.
Choosing the Right Audio Equipment
Choosing the right gear is important. You need to think about your room, what you like, and the gear’s details. Tips for monitoring equipment can help you get better results. Advice often highlights the need for good placement and treating your space acoustically.
Monitoring Option
Advantages
Considerations
Studio Monitors
Flat frequency response, wider soundstage
Potential room acoustics issues
Headphones
Isolation of sounds, detail enhancement
Risk of uneven frequency response
Combination of Both
Balanced approach, versatility
Requires careful management of levels
By learning to use different audio monitoring options and picking the right tools, you can boost your recording and mixing work with the Zoom R16.
Conclusion
Connecting the Zoom R16 to a computer opens up exciting possibilities for audio recording and mixing. This guide has shown you how to make the most of your Zoom R16 in different recording situations. By doing so, you can create high-quality audio for your projects.
We’ve covered how to transfer .wav files effectively. Also, keeping the firmware updated is key to getting the most out of your R16. The guide provides clear steps for using USB drives or cables to streamline your workflow. This makes things more efficient.
As you finish this guide, remember the importance of correct file names and project settings. Following these tips will make the recording process easier and improve your audio project outcomes.
FAQ
What is the Zoom R16 and how can it enhance my recording experience?
The Zoom R16 is a multi-tasking recorder. It works as an audio interface and control surface too. It improves recordings by capturing audio in real-time, allowing seamless mixing. It’s great for both live and studio recordings.
What do I need to connect the Zoom R16 to my computer?
You need a USB cable that works with the Zoom R16 to connect it to a computer. You must also have the right drivers on your computer. Plus, a digital workspace that processes audio well.
How do I install the Zoom R16 driver?
Go to the Zoom website to download the right driver for your system. Follow the steps to install it. After installing, reboot your computer and check the driver’s status in Device Manager.
How do I configure the Zoom R16 as an audio interface?
Switch on the Zoom R16 and pick the audio interface mode from the settings. Make sure you set the right sample rates and configurations. This ensures the best recording quality.
What steps should I follow to connect the Zoom R16 to Reaper?
First, adjust Reaper’s project settings for the Zoom R16. Set audio preferences, turn on input monitoring, and check all inputs are recognized. This helps you record multiple tracks effectively.
How can I test the functionality of the R16 within Reaper?
To test, check the input levels and outputs in Reaper. Make sure the audio signs go through Reaper correctly. Finding and fixing any issues now is key for good recording later.
Can I use the R16 as a control surface in Reaper?
Yes, you can use the Zoom R16 as a control surface in Reaper. It lets you control the DAW with knobs and sliders. This makes working much easier than just using the mouse.
What common issues might I encounter with the R16?
You might face issues like driver conflicts, or the device not being recognized. Sometimes, there’s latency trouble too. To fix these, update your drivers and check the audio settings in Reaper.
What are the best options for monitoring my mix?
For mix monitoring, consider studio monitors or good headphones. Monitors give a clear sound, while headphones focus on details. Both are key for top-notch recordings.
How should I select audio equipment to use with the Zoom R16?
Think about your room’s acoustics, the tech specs, and what you prefer. This helps you choose the best equipment for great recordings with the Zoom R16.
Our comprehensive guide will show you how to install Lexus software on your desktop. Wondering if your computer is fit for this? You’re in the right spot. We’ll explain the important steps and what you need, making sure you’re ready to install the software easily. It’s vital to know if your desktop can handle the…
Human-Computer Interaction (HCI) is becoming very important in computer science. It looks at how people use technology. As an elective, it helps students learn more about tech and user experience. Let’s look into why HCI is important, its course setup, real-world uses, and what might come next. Many schools, like Carnegie Mellon University, now offer…
Having your screen stop or blur during a video can be very annoying. It’s even worse when you’re watching your favourite film or in the middle of a crucial work presentation. These problems can come from software issues or not enough hardware power. As we watch more digital media every day, it’s key to know…
A Wide Area Network (WAN) connects different local-area networks (LANs) across large distances. This includes various technologies such as Asynchronous Transfer Mode, Digital Subscriber Line, and Wi-Fi. The Internet is the biggest example of a WAN, providing global connectivity. WANs are key for communication today, supporting tasks from business operations to daily life. They allow…
Computer programming has changed a lot recently, catching the eye of big newspapers, like The New York Times. This well-known paper has been covering how programming has changed. It talks about its effects on society and new coding trends. The rise of coding boot camps and seeing programming as a good career choice are hot…
The idea of swapping a car stereo for a computer isn’t far-fetched anymore. Thanks to tech advancements and computer audio integration, you can now replace your car stereo to boost your drive. This upgrade doesn’t just better your audio. It brings new, modern features to your car. Adding a computer head unit gives your vehicle…